
Creating a Cover For Your Createspace Print Book
![Pageflex Persona [document: PRS0000443_00055]](http://katrinarasbold.com/writing/wp-content/uploads/2014/07/sm-372x230.jpg)
The process of creating a print cover is different from making an ebook cover because you have to create not only a front, but also a spine and a back for the cover. Imagine if you laid out a CD cover flat and you will have an idea of how the final product will look. This will be created as one file.
As with the creating of an ebook cover, you must make certain you have permission to use any graphic elements that are not in the public domain. You will need to have a working knowledge of how to use a good graphics program like Adobe Photoshop to create your own cover. Your graphics-editing program must also be able to produce a cover in PDF format as that is the only file Createspace will accept for a cover. You may certainly use your ebook cover as a starting point, but it may have to be resized or otherwise adjusted to work.
As you can imagine, the size of your book, both in trim size and in the number of pages, will determine the size of your cover. I completely recommend using the Createspace cover template creator if you intend to design your own cover from scratch. The link is below:
https://www.createspace.com/Help/Book/Artwork.do
Enter the information based on your manuscript and paper color choice. Click on “Build Template” and the template will be created in a zip file. Click on “Click here to begin Download” and the template will download to your computer. You will then need to extract the file and open the PDF template in your graphic editing program. This file will provide the foundation for your cover, including the exact specifications you need for each part of the cover.
IMPORTANT: Please note that books with fewer than 130 pages, it is recommended that you leave the spine blank. For books with fewer than 101 pages, it is mandatory that you leave the spine blank.
Your template will look like this:
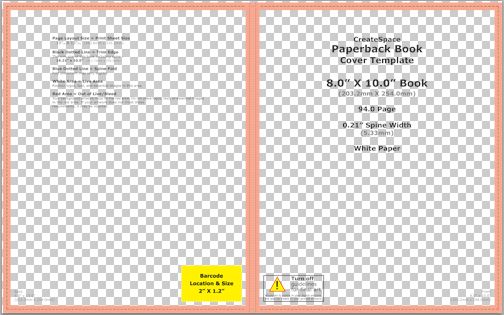
Since this is for a book with 100 pages, you will see that the spine is pink. You should never put text or graphics in the pink areas. These are your “bleed,” which is an area for the “extra” part of your graphics to make sure they will extend all the way to your book cover’s edges. In a larger book, the spine will have open areas that you can use for your book’s title and your name. Your book cover should encompass this entire template, including the bleed (although areas within the bleed will not be shown in the final result). On the back cover, you can include comments reviewers made about your book, endorsements your have received, a synopsis of your book, or whatever you choose. You may even want to include a photo of yourself. Do NOT cover the yellow barcode area as this is where the barcode and ISBN for your book will be located.
If you have a book large enough to allow for spine text, include your last name in capital letters at the bottom of the spine and the book’s title in mixed capitalization at the top. Rotate the text to a perfect 90 degree angle and center it on the spine.
Remember to remove your template from the layers and then flatten your graphic before you save and upload it. You are only allowed a 40 MB file for your cover and flattening the file will reduce the size significantly.
Make sure to save your cover as a PDF, then upload it to Createspace.