
Formatting Your Manuscript for Createspace

Kindle Direct Publishing is the division of Amazon that handles the self-publication of ebooks. Createspace is the division of Amazon.com that handles the self-publication of print books (paperbacks). Createspace will publish your book in either color or black and white with several options within those two parameters. Createspace is a “print-on-demand” service, which means that when a buyer orders your book, Createspace will print it up and send it out. They do not generally keep pre-printed copies of your book just hanging around in case someone orders one. Buyers may purchase your book through the Createspace store or through Amazon.com. When they purchase through the Createspace store, you usually receive a higher royalty return than when they purchase through Amazon.com.
The process to upload your zipped up file of pictures and words to KDP for submission may sound daunting, but it really is a simple step-by-step process. The most frustrating part for most people seems to be the use of images, getting them in order, and bundling them up into the zip file for submission.
Print publication is a whole other beast and the gremlins that can come out of the dark corners of the process are many and sometimes, aggressive. The Createspace interface is not complicated, but it is demanding and very specific. The KDP upload is much more forgiving, so pay close attention here.
This is the point where, after hours of working on a project, many authors get discouraged, throw up their hands, and give their royalties to away to someone else so they do not have to battle with it anymore. Once you get the hang of it and really understand how it works, it is not nearly as intimidating. Be gracious and patient with yourself and understand that there is a sharp learning curve with this process. Whatever you do, do not try to learn this when you are in a hurry.
Trim Size
You only have to look at your own collection or glance around a bookstore or library to know that paperbacks come in all sizes. The “trim size” of your book is how big your print book will actually be. You have to tailor both your cover and your manuscript document to the trim size you choose. That will depend on the type of book you have written and the number of pages in it.
As a rule, the typical non-fiction book is an 8×10” trim size and the usual novel/non-fiction book is a 6×9” trim size. On Createspace, your page numbers must fit into these parameters:
8×10” trim size/white paper = 24-440 pages
8×10” trim size/cream paper = 24-400 pages
6×9” trim size/white paper = 24-828 pages
6×9” trim size/cream paper = 740 pages.
The number of pages stated includes ALL pages; your actual manuscript, plus any front and back matter, reduced to the chosen trim size. In other words, these numbers do not reflect 24 pages in a standard MS Word unless you have already sized the document into the desired trim size.
To change the size of your MS Word document, follow these steps:

Click on “Page Layout” and “Size.” Select “More Paper Sizes” from the drop down menu. That will bring up this screen:
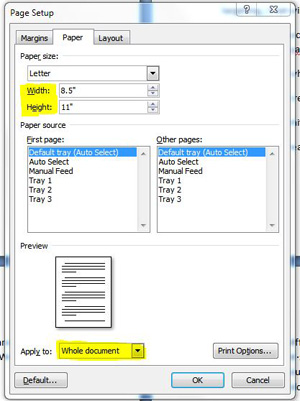
Change the width and height to your desired trim size and make sure that you choose “Apply to Whole document.” Click “OK.”
MS Word will then reconfigure your document to the desired size.
Margins
Think about the physical structure of a print book. When you open it up and look at the pages, the text centers squarely on the pages, with pages facing one another. A part of the pages buries into the middle and connects at the spine. We call the part of the pages that is not useful for text the “gutter.” This means that a manuscript will look odd when it is not in book form in order to accommodate the gutter space. The required margin must exist on each side of the text, and you will need to add a deeper space to the right of pages on the left-hand side of the book and a deeper space on the left side of the pages that are on the right side of the book. We accomplish this using “mirror margins.” Look at the example below:
You can see that the margins on the outside of the pages are significantly wider than margins on the inside of the pages. This is because when you look at your manuscript in MS Word form, you are seeing the pages in reverse. Pages that are on the right in your MS Word document will be on the left in your actual book. These wider margins create your gutter space.
The size of your gutter depends on the number of pages in your book after you have adjusted the trim size.
Createspace offers the following suggestions for margin settings:
|
Page Count |
Inside Margin | Outside Margins |
|
24 to 150 pages |
.375″ |
at least .25″ |
|
151 to 400 pages |
.75” |
at least .25″ |
| 401 to 600 pages | .875″ |
at least .25″ |
| More than 600 pages | 1.0″ |
at least .25″ |
I keep my outside margins at 1” for nonfiction in an 8×10” trim size and .75” for my fiction books in a 6×9” trim size. I then set the gutter according to the above specifications.
Change the settings using the following steps:

Click on the “Page Layout” tab and open the “Margins” drop down menu. Select “Custom Margins” at the bottom. That will open this screen:

Set your margins in the boxes provided. Under “Pages,” change the “Multiple pages” setting to “Mirror margins” as shown and the “Apply to:” setting to “Whole document.” Click OK.
Remember that when look at your manuscript document after you have made this adjustment, the pages are going to look offset from one another because of the gutter and the mirror margins, so do not panic when things look wonky.
Front and Back Matter
Your front and back matter is very similar to an ebook, but you will have to consider pagination more so than you would with ebook publishing. A Kindle is more forgiving about front matter and space pages than is a print book.
Pick up a print book and look at how it is laid out. There are some pages in the front that are blank or filler. When you look at the MS Word document that is your manuscript, it is important to remember that the pages on the RIGHT side of the document are ODD number pages and the pages on your LEFT side are EVEN numbered pages. Again, this is the reverse of how your manuscript appears in MS Word initially.
This gives you an idea of how the book will lay out in print form. Generally, you will want the first pages of your actual text, including any introduction, to begin on an odd page (the right side). It is fine for other material, such as your table of contents, your author information, or your copyright statements, to begin in either side. Page 1, of course, will always be on the right side in the print book. You may wish to insert a blank page into the front matter to balance out the flow of pages. Play with the pagination a bit and see what looks best to you. I actually use folded pieces of printer paper with rough notes identifying each page and put them together in a makeshift faux book so I can physically see how the layout will present in print.
Createspace will rarely micro-manage you in terms of your layout. There is an “eyes on” process of acceptance of your document, but their influence is limited for the most part to sizing, margin space, and image resolution. Your book is going to print pretty much the way you lay it out, so it is essential that you take your time and get it right.
Line Spacing and Other Layout Considerations
The line spacing of a print book is the same as that of an ebook, except that most ebook readers have the ability to increase or decrease the font size. Obviously, that is not possible for a print book, so you have to make certain that your font size and line spacing work together to present a readable format.
You will still follow the rules of ebook publication as far as indentation and line spacing. Non-fiction books do not have indented paragraphs and have a larger space after each paragraph and fiction books have indented paragraphs with no space between paragraphs (see Chapter 6 for instructions on how to do this).
Once you have set your trim size and margins, glance through your book page by page and make sure you have no “widows and orphans,” which are chapter headings and subheadings that are sort of left out there on their own. In the case of print books, the appropriate use of page breaks, also discussed in Chapter 6, is particularly vital to present a polished, professional product.
Look at any images you have inserted into the document and make sure that they are not throwing off the paragraph placement of the book. You may need to rearrange the text or resize or remove the image to better accommodate the flow of the layout.
You should never leave your chapter headings (Heading 1) and subheadings (Heading 2) hanging alone on the bottom of a page. If you find this happens, insert a page break before the heading.
Your Page Numbers and Table of Contents
Front matter and back matter are the same as with ebook publication with the exception of your table of contents (TOC) and any blank pages you add for balance. In an ebook, your TOC is composed of interactive links to the corresponding chapter or section. In a print book, the TOC relates to page numbers, so not only do you have to construct the TOC in a different fashion, but you also have to add page numbers to your manuscript, which sound easy but can be very tricky.
The finesse comes in the fact that you want to index your main text in your TOC, but not your front matter. This means you have to create SECTIONS and tell the page numbers how to behave.
First, remove any existing TOC that may be in place from ebook publication.
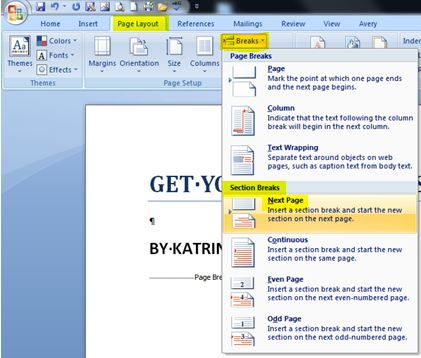
Insert a “Section Break” after the front matter you want to exclude from the TOC and before the main text that you do want to include in the TOC.
Click on the “Page Layout” tab and then expand the drop down menu under “Breaks.” Select “Next Page” under the “Section Breaks” section.
Once you have inserted your section break, you will no longer need the page break that may have already been there, so you can delete it.
Once your sections are established, you can add your page numbers.
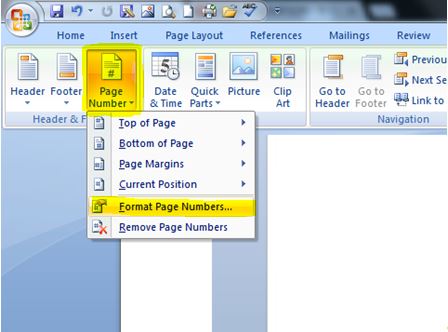
Go to the “Insert” tab and choose “Page numbers, then “Bottom of the page” if that is where you want your page numbers to be. You may then click on several types of formatted page numbers.
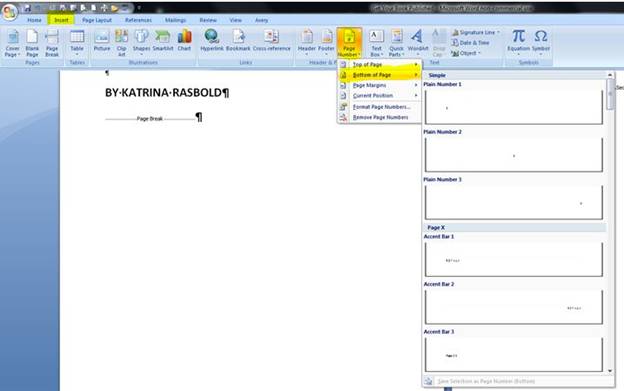
As soon as you click on your choice, your page numbers will appear in the footer of the document.
Because you have more than one section in your document, you have to tell Microsoft Word how to manage the page numbers in each section. Otherwise, the numbers will proceed consecutively through sections.
After the page numbers have been inserted, go to your main text and click TWICE on the page number in the footer at the bottom of the page. That will open the Header & Footer Tools bar. Click on “Page Number” and “Format Page Numbers.”
That will open this screen:
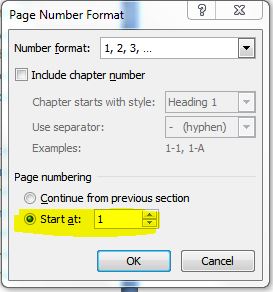
Make sure “1, 2, 3” is selected for the number format and set the “Start at” option to “1” under “Page numbering.” Click OK.
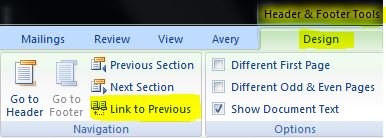
Next, look up at the Header & Footer Tools bar and Unselect “Link to Previous.” This will keep your page numbers from relating to the previous section.
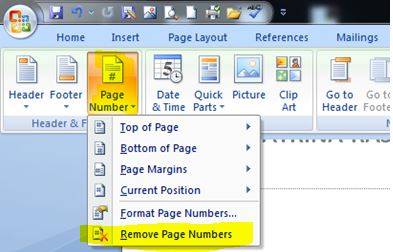
Go to your first section (front matter you did not want included in the TOC) and double-click on the page number.
In the Header and Footer Tools bar, click on “Page Number” and then select “Remove Page Numbers.” This will take the page numbers off your first section, but leaven them on your main text.
If it takes the page numbers off the whole document, you did not successfully unlink your sections and you will need to retrace your steps beginning with the instructions on creating a new section.
Now that you have page numbers on the main text of your manuscript and no pages numbers on your front matter, you are ready to insert your table of contents.
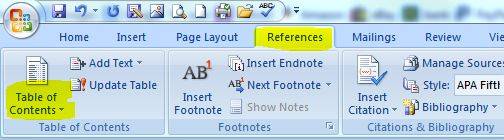
Just as with the table of contents of an ebook, you will click on the “References” tab and then expand the “Table of Contents” drop down menu. Chose “Insert Table of Contents,” which will open the following screen:
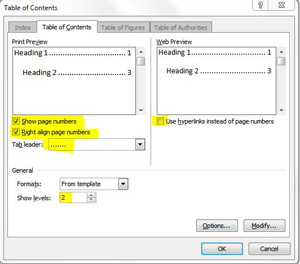
Select “Show page numbers,” and “Right align page numbers.” The tab leader should be dots. Unselect “Use hyperlinks instead of page numbers” if it is checked. For “Show levels,” I do not recommend going beyond two levels, which includes your Heading 1 and Heading 2 chapter headings. Depending on the scope of your book, you may wish to include only one level. Click OK.
This will insert your table of contents, which is editable within the table itself if you need to make changes. Do not insert the table of contents until your book is complete or the numbers may be off. You may right click within the table of contents and choose “Update field” if you want to make sure your page numbers are current and accurate. Having an inaccurate or malfunctioning table of contents is a common rookie error and is a chief cause of complaints in review comments.
Rest assured that once you have set your trim size, your margins, and your gutter and inserted your page numbers and table of contents, you have completed the hardest and most complicated part of this whole operation. You may need to nip and tuck a few places, but this is the roughest patch. It is this part and the uploading process that often cause authors to hand the process over to a middleman out of sheer frustration. If you made it this far, you are doing GREAT.
Thanks for this great article. I use Open Office. This is all fascinatingly new to me and I’m not sure I quite understand how to make the TOC. In a book of short short stories that have some, let’s say, 3 or 5 page stories, how do you adjust the contents settings so page 4 doesn’t become the first page with the new story, which should be on an odd page, or is all this done manually? Am I making any sense??? Getting the pages numbered automatically is my next problem, if that’s done at all. And are titles set to automatically appear italicized in the same position for all stories? Thanks for any help. You couldn’t possibly imagine how frustrating this is all making me.!!! But, it’s fun! I’m working in Create Space best as I can.
By the way, will I get an answer via email, or do I go looking for it, if so, where? Thanx.
Thanks, Lou. Unfortunately,I have zero experience with Open Office, so can’t really advise on that program. I work exclusively in Word 365.