
Formatting Your Manuscript With Graphics
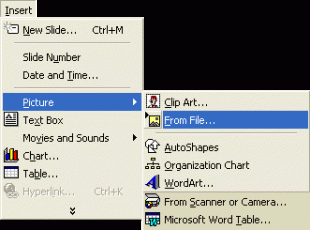
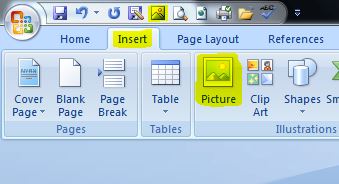
To insert your images into your MS Word document, click on the “Insert Picture from File” icon on the main toolbar OR click on the “Insert” tab and select “Picture.” Either of these actions will take you to a prompt that allows you to select your image from your computer files and insert it into your manuscript.
You may then align the image (centered, left, or right) in relation to the text. Do NOT use MS Word to alter your image beyond alignment. Your image should be “print-ready” by the time you insert it.
There is no limit to how many images you may use in a manuscript, however, for both print and ebook formats, extensive use of images increases the overhead production costs.
Any images you insert into your manuscript automatically adopt the “Normal” style setting. If you alter your “Normal” style setting after you insert images, the alignment of the images will change to the new “Normal” alignment and move left if you previously centered the image. Simply realign the images to “centered” if that is your preference.
Re-insert Your Graphics When You Complete Your Book
This is going to sound like a colossal waste of time and energy, but ultimately, it will save you a lot of grief simply because of the format Kindle Direct Publishers requires for submission (a zipped up filtered html document).
Go through your manuscript completely from front to back, serially, no backtracking, no graphic moving, no cutting it out here and pasting it in there. From start to finish, go through your book and re-insert every graphic, every photo, every illustration in order from your computer files and make sure they are aligned as you desire (centered, etc).
These steps should bring your manuscript to completion for Kindle Direct Publishing submission. You will need to format the manuscript quite differently for submission to Createspace for print publication as opposed to e-publication.
If you include ANY images in your manuscript, you will have to save your manuscript as a filtered webpage and zip it up to submit it to KDP. ONLY manuscripts with NO images may be submitted to KDP using a .doc or .docx file.
Saving and Zipping
When you upload your manuscript, you need to do so as one file. This means you have to bundle up your MS Word document plus all of your graphics into a zip file to upload to KDP. After you re-insert your graphics and are completely satisfied with your manuscript format, click on the office button…

…in the upper left hand corner of the window and choose “Save as” from the drop down menu.
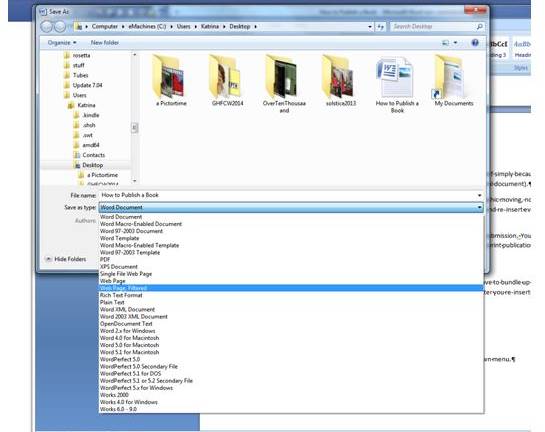
From the “Save as” drop down menu, choose “Web Page, Filtered” and save it to your desktop or where ever you intend to put it. You will possibly get a couple of prompts telling you about how it will be saved and what may be lost. Just click through those.
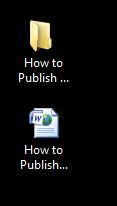
Once you have saved your manuscript as a filtered web page, you will have TWO items in your save location. For demonstration purposes, I saved my files to my desktop. One is a folder of files and one is the html file that you just created. Below, the folder of files is the top icon and the html file is below it.
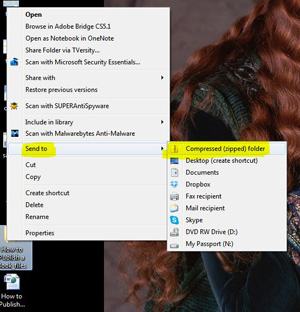
Next, you will zip up the folder. Do that by right clicking on the folder (top icon) and choosing “Send to” and then “Compressed Zipped Folder” from the expandable menus as seen below.
That will create a zip file (compressed folder) in the same location as the original folder. When you upload this zip file in the submission process, KDP will unzip it and read the contents for processing. You now have three items in the save location:
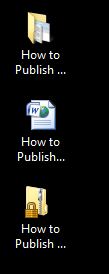
The bottom one is your zip file. Now, drag the html file (on the example above, it is the middle file) into the zip file using your mouse cursor. It will drop right in there if you drag and drop it.
The zip file with the html file dragged into it is what you will submit to KDP.